Buzz through your reporting offline – it’s much quicker!
You can now use Inventory Hive online or offline on iPad and iPhone whilst visiting your properties, meaning you don’t have to rely on network coverage and data charges won’t apply from your network provider. What’s more, offline usage is quicker as it doesn’t have to connect to a server when in use!
The Android version is expected in the next two weeks from the date of this article too (updates to follow). Here’s a quick step-by-step guide to working offline…if you’d prefer to watch the ‘Work Faster – Offline App Demo Video’ click here! We’ve also updated the FAQs section (see ‘iOS App’ heading).
Step 1
To use the app you’ll first need to ‘Get Started‘ and setup a free trial login (no card details needed). Already got a login? Go to step 2…
Step 2
Download the app for free by visiting the App Store (Android version expected in a couple of weeks).
Step 3
This bit’s important – before working offline you’ll always need to login and sync with Inventory Hive cloud first. Don’t worry, this happens automatically. All you need to do is make sure you have Wi-Fi or network coverage (4G recommended) when you first login to the app. This then downloads your property data to your iPhone or iPad.

Step 4
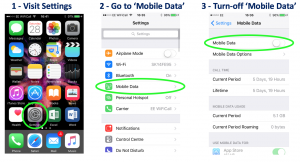
Once you’re logged in, you can then switch to offline mode. To do this, go to ‘Settings‘ on your device and then ‘Mobile Data‘. Press the ‘Mobile Data‘ button to turn off network coverage. If you’re connected to Wi-Fi, you’ll need to turn that off too. Then, hey presto – you’re now working offline (please note: you can still make calls when mobile data is turned-off, you just won’t be able to access the internet). The images below show how these screens will look…
You can now create your inventory, check-in, inspection, check-out and right to rent reports entirely offline. Also, there’s no time limit from when you login online to switching offline. This means you can keep your app running behind the scenes for whenever you need it. Importantly it remains dormant – so it won’t drain your battery.
Step 5
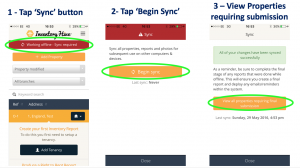
Once you’ve created your report offline – it’s important to then sync with the Inventory Hive cloud again. Simply re-connect to your network or Wi-Fi and then tap the sync buttons. This will send the information from your device to the the cloud. Syncing to Wi-Fi will of course avoid any possible network data charges.
Step 6
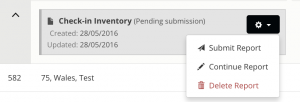
After syncing, all that’s left to do is preview and submit your final report. You’ll know which reports are pending submission, because they will have an icon that says ‘Pending Submission‘.

Don’t forget to preview and submit your final report…..
Click the house icon next to the property and choose ‘Show reports‘. Then click the cog icon and choose to ‘Continue Report‘ – this allows you preview the report before final submission. Alternatively, just choose ‘Submit report‘ and there you go – all done. The system will then generate emails to tell you what happens next, taking you through step-by-step.
You can print off this blog or save it as a PDF by clicking the: ‘Work Faster – Offline App Guide’. Alternatively, if you have any other questions at all – please contact the Inventory Hive support team.